Developing for the iphone using the open toolchain and SDK 2.0 headers
Monday, 08 September 08
Release notes
- 26 Sep: added warning about the need to install even a single free application from AppStore before to try this guide.
- 22 Sep: now there are instructions about iPhones with 2.1 firmware (and SpringBoard cache), and some missing information is now included.
Introduction: iPhone development and the Open Toolchain
It is possible to write native applications for the iPhone in Objective-C, but in order to be able to do so it is needed to have a Mac with the SDK downloaded from Apple. You need to have a MacOS installation, be a registered Apple developer, download the SDK, use the graphic environment, and so on.
Fortunately there is an alternative, the Open Toolchain: it's a special GCC compiler able to emit code for the iPhone CPU (and other tools to create the final executable).
The Open Toolchain can be used from your Linux box, this is how most developers are using it. This guide instead is about using the Open Toolchain directly inside the iPhone!
Actually the iPhone runs an operating system very similar to Unix, so there is a port of the compiler for the iPhone itself. It is possible to use SSH to work inside the iPhone, editing files with VIM, compiling with this GCC, and installing the resulting binary in order to test it on the real device.
The following parts of this document will try to explain how to setup a development environment inside the iPhone, what you need to do, the files you need to download, and finally will provide an Hello World example in order to make you able to test something in little time, and to have a starting point to modify.
What you need
- a Jailbroken iPhone. In order to Jailbreak check QuickPwn at blog.iphone-dev.org. Warning: the jailbreaking process will make your phone able to run non-apple-signed binaries but may damage your phone. If you have problems and ruin your phone I'll not be responsible in any way.
- Cydia (this is an apt-get for the iPhone. Basically it is a program that installs other programs). Cydia will be installed by QuickPwn, just make sure to select it during the Jailbreaking process.
- SDK 2.0 headers. The GCC alone is not enough, you need the header files from the Apple iPhone SDK. Just download this torrent or use instead this link from megaupload, what you need is the sdk-2.0-headers.tar.gz inside. The alternative way to obtain the headers is to download the full SDK and extract the headers from the SDK image. It's pretty hard and boring, the torrent is a better solution for now.
- Warning: YOU NEED TO INSTALL SOMETHING FROM THE APPSTORE! even a free application is ok, otherwise your iPhone for some reason will not execute your compiled binaries.
Ok, now I assume you did the jailbreak, and your iPhone is free :)
Prefect, we are ready! Your iPhone was jailbroken and everything is working fine. You can see the new Cydia application in your iPhone.
Now it's time to connect the phone to a Wifi network. Cydia needs to get stuff from the internet that will be installed in your phone. This is what you need to do:
- Open Cydia and install the GCC. If you can't find it just use the search feature of Cydia. Then instal make and ldid just like you installed GCC. (ldid is used to pseudo-sign binaries).
- Install SSH, and BossPref (Again from Cydia).
Well, first stage complete! Now you should be able to enter inside your
phone using SSH.
Note that Cydia also installs a lot of other things when you run it the first time: all the standard Unix command line utilities including the 'make' command that we will use later to build our Hello World application.
Let's try to enter inside the iPhone via SSH
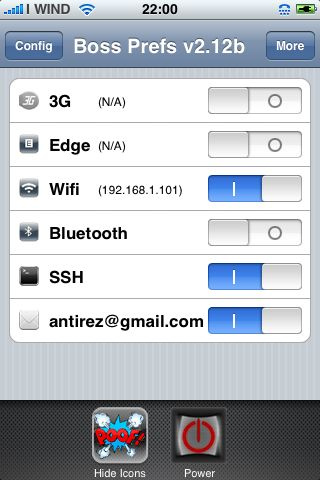
Ok, now exit from Cydia, Open BossPref and check the IP address of your phone, you can see it from the BossPref starting page. Also while in BossPref enable SSH.

As you can see in the example the IP address of the wifi interface
is 192.168.1.101. So... we are ready to enter inside the iPhone!
From your Linux box try this (otherwise for windows users use
the program Putty):
ssh root@192.168.1.101
Of course use your iPhone IP address instead of 192.168.1.101 ;)
If you are using Putty use the IP address as hostname and "root" as username.
The default root password is "alpine"
Use this to enter inside the iPhone.
It works? Uaaaaaaaaoo!!! this is a good start.
Now it's time to transfer the SDK 2.0 headers inside the iPhone.
In order to do so use the SCP program (Linux users) or SFTP (Windows Users).
scp sdk-2.0-headers.tar.gz root@192.168.1.101:/var
If you are a Windows user make sure to copy the file inside the /var folder.
Ok now enter again inside your phone via SSH and untar the headers.
This is the commands you need to perform:
ssh root@192.168.1.101 # Or use Putty if you are a Window guy
cd /var
tar xvzf sdk-2.0-headers.tar.gz
mv include-2.0-sdk-ready-for-iphone include
Ok... now you should be ready to start compiling and testing applications.
Hello World!
I hate tutorials explaining how to setup an environment without to give at least a little example, so here there is the source code and the steps to put an Hello World Objective-C application, build it, install it, run it.
While I'm at it I'll try to explain a bit how the hello world program actually works, and the anatomy of an iPhone application.
Anatomy of an iPhone application
Fortunately Apple designers take the clean and easy path to put everything about a given application inside a directory in a self contained world where the application will take the executable, icons, sounds, and generally all the data the application needs in order to run.
For example our Hello World program will be installed inside the iPhone under
the /Applications/HelloWorld.app directory. This is the layout of the HelloWorld.app directory:
# ls -l HelloWorld.app/

-rw-r--r-- 1 root admin   108 Sep 11 12:45 Default.png
-rwxr-xr-x 1 root admin 14192 Sep 11 12:45 HelloWorld*
-rw-r--r-- 1 root admin   812 Sep 11 12:45 Info.plist
-rw-r--r-- 1 root admin     9 Sep 11 12:45 PkgInfo
-rw-r--r-- 1 root admin  2399 Sep 11 12:45 icon.png
This files are the minimal set of files you'll find inside a working application directory:
- Default.png is a PNG image that will be shown on the screen while the application is loading. In our example it's just an empty png.
- HelloWorld is the binary executable, the result of compiling our Objective-C source code.
- Info.plist is an xml file that specifies the program name, version, and other information about our program. This is how it looks like (it's not too complex):
<?xml version="1.0" encoding="UTF-8"?>
<!DOCTYPE plist PUBLIC "-//Apple Computer//DTD PLIST 1.0//EN" "http://www.apple.
com/DTDs/PropertyList-1.0.dtd">
<plist version="1.0">
<dict>
        <key>CFBundleDevelopmentRegion</key>
        <string>en</string>
        <key>CFBundleExecutable</key>
        <string>HelloWorld</string>
        <key>CFBundleIdentifier</key>
        <string>org.iphone.HelloWorldapp</string>
        <key>CFBundleInfoDictionaryVersion</key>
        <string>6.0</string>
        <key>CFBundleName</key>
        <string>HelloWorld</string>
        <key>CFBundlePackageType</key>
        <string>APPL</string>
        <key>CFBundleShortVersionString</key>
        <string>1.0.0</string>
        <key>CFBundleSignature</key>
        <string>????</string>
        <key>CFBundleVersion</key>
        <string>1.0</string>
        <key>SignerIdentity</key>
        <string>Apple iPhone OS Application Signing</string>
</dict>
</plist>
You'll need to create a new Info.plist file for your new applications, but for the Hello World example this one is already good and working.
- Pkg.info: I don't know what this file is supposed to do, I just grabbed it from another Hello World example and all it contains is the string "APPL????".
- icon.png: Your application icon, this is what you will see in the springboard after the program is installed.
Basically all it's needed in order to install a new application is to copy the YourApplication.app directory inside the /Applications directory and restart the springboard using the command: killall SpringBoard.
Source code layout
What we seen in the last section is how the installed application looks like. Actually we need to deal with another directory layout that's the one of our source code... but before to continue it's better that you download our first hello world example and extract it on the iphone under the directory /var/mobile/src. The first step is to create the directory inside the iPhone so as usually enter via SSH inside your phone and write:
mkdir /var/mobile/src
Then from your linux box (or using SFTP from Windows) use the following command to transfer the file inside /var/mobile/src:
scp iphone-helloworld-1.tar.gz root@192.168.1.101:/var/mobile/src
Then enter inside your iPhone and use the following commands to extract the example:
cd /var/mobile/src
tar xvzf phone-helloworld-1.tar.gz
Now our first example is inside the phone! Ready to be compiled. But... try to stop your impatience for a moment and let's look a bit to our source structure:
ls -l HelloWorld             /home/antirez/hack/iphone/article

drwxr-xr-x 2 antirez antirez 4096 2008-09-11 12:47 build/
drwxr-xr-x 2 antirez antirez 4096 2008-09-11 12:47 Classes/
-rw-r--r-- 1 antirez antirez  812 2008-09-11 12:46 Info.plist
-rw-r--r-- 1 antirez antirez 2301 2008-09-11 12:46 Makefile
drwxr-xr-x 2 antirez antirez 4096 2008-09-11 12:46 Resources/
As you can see there are different directories and files:
- build: is a directory where thanks to the make command targets the HelloWorld.app directory with all the stuff needed is created, so that make install will be able to copy the final directory under /Applications.
- Classes: is where our source code lives (.m and .h files, Objective-C files are .m and not .c or something like this).
- Info.plist... you already know it from the HelloWorld.app directory.
- Makefile contains the make targets to compile the program, create the build, install, and so on.
- Resources are just data files needed to create the final build, in our case just the two images Default.png and icon.png.
It's time to test the example
Ok, it's time to compile and try it... so inside your tell use the "cd" command to enter the HelloWorld directory and use this commands:
make
make install
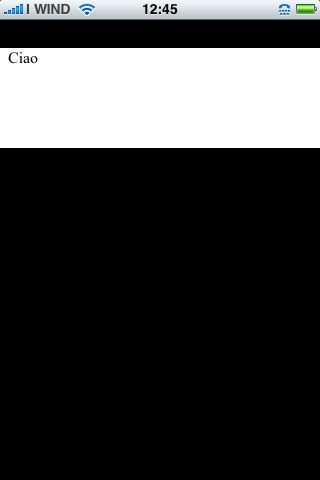
Since make install will also restart the springboard you will see the progress bar on your iPhone screen rotating for some seconds (it may even take almost a minute if you have a lot of apps installed) and finally you should see the "HelloWorld" application icon... launch it! This is what you should see:

Importante, 2.1 firware users read this: due to changes to the iPhone SpringBoard now the iPhone takes a cache of applications: just to restart the SpringBoard is not enough after
make install in order to show your new icon. Use the following command:
/Applications/BossPrefs.app/Respring
(It's useless to say that you need BossPrefs installed to issue this command ;)
This will force the iPhone to see that there is something of new inside /Applications.
Herm... Are you impressed, aren't you?! :)
Ok it's lame but it is a good start! because the code is trivial and you can use it as a starting point for your hacks.
Making the modify, recompile, install, test cycle a bit more fun
WORK IN PROGRESS...
Translations
License

This work is licensed under a Creative Commons Attribution-Noncommercial 3.0 United States License.
home


